Imagine being able to control your Raspberry Pi device from the comfort of your couch—or even while you're miles away. Sounds like a dream, right? Well, with SSH (Secure Shell), it's not just a possibility—it's a reality! Whether you're a tech enthusiast, a hobbyist, or just someone curious about remote access, this guide will walk you through everything you need to know to connect to your Raspberry Pi from anywhere in the world.
Let’s face it, remote access is no longer a luxury; it’s a necessity. Whether you’re tinkering with IoT projects, running a home server, or just trying to impress your friends with your tech skills, being able to SSH into your Raspberry Pi can save you tons of time and effort. And the best part? It’s not as complicated as it sounds. Stick around, and we’ll break it down step by step.
Before we dive deep, let’s get one thing straight: SSH isn’t just some fancy tech term. It’s a powerful tool that allows you to securely connect to your Raspberry Pi from any location, as long as you have an internet connection. So, whether you’re fixing a script on your Pi or managing files remotely, SSH has got your back. Ready to level up your tech game? Let’s get started!
Read also:Top Picks For Restaurants In Coconut Creek Casino Your Ultimate Dining Guide
What is SSH and Why Should You Use It?
SSH, or Secure Shell, is like the Swiss Army knife of remote access tools. Think of it as a secure tunnel that lets you control your Raspberry Pi device from anywhere, without exposing your system to hackers or malicious attacks. SSH encrypts all communication between your device and the Raspberry Pi, ensuring that your data stays safe and sound.
Here’s why SSH is a game-changer:
- Security: SSH uses encryption to protect your data from prying eyes.
- Flexibility: You can access your Raspberry Pi from any device with an SSH client.
- Efficiency: No need to physically interact with your Raspberry Pi every time you want to make changes.
Whether you’re managing a server, automating tasks, or just tinkering with code, SSH makes life easier. Plus, it’s free! So, why not take advantage of it?
Why Use Raspberry Pi for Remote Access?
Raspberry Pi devices are tiny powerhouses that pack a surprising punch. These little gadgets are perfect for remote access because they’re affordable, energy-efficient, and highly versatile. Whether you’re using a Raspberry Pi 4, 3, or even the older models, you can set up SSH and start controlling your device from anywhere.
Here’s what makes Raspberry Pi ideal for SSH:
- Compact Size: They’re small enough to fit anywhere, but powerful enough to handle complex tasks.
- Community Support: With tons of tutorials and forums dedicated to Raspberry Pi, you’ll never run out of help.
- Customizability: You can tailor your Raspberry Pi setup to suit your exact needs, whether you’re running a web server or a media center.
So, if you’re wondering why Raspberry Pi is the go-to choice for SSH, the answer is simple: it’s the perfect blend of power, affordability, and flexibility.
Read also:Temporary Replacement 3 Full Hyungry Your Ultimate Guide To Surviving Hunger With Style
How to Set Up SSH on Your Raspberry Pi
Setting up SSH on your Raspberry Pi is easier than you think. Follow these simple steps, and you’ll be up and running in no time.
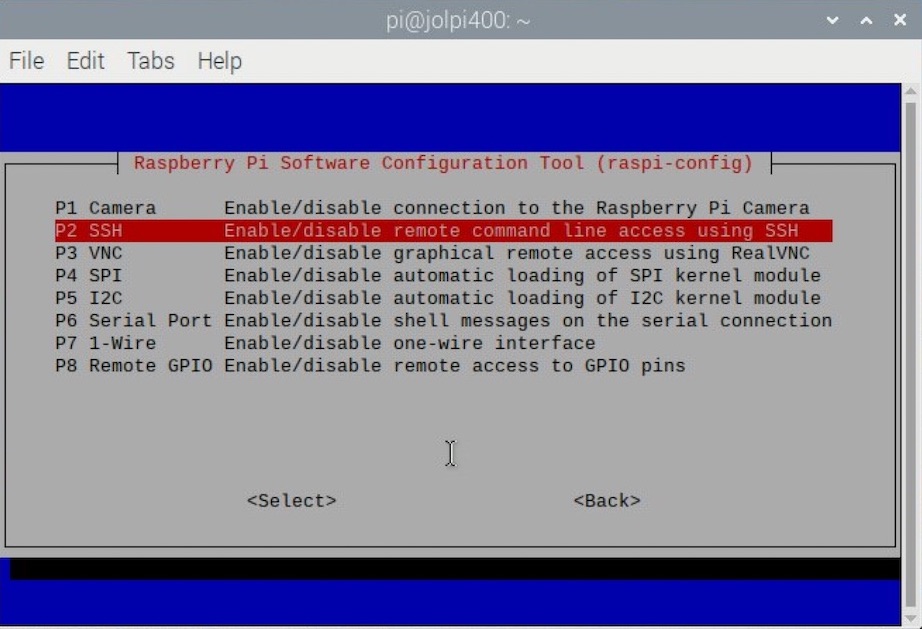
Step 1: Enable SSH on Your Raspberry Pi
First things first, you need to enable SSH on your Raspberry Pi. Here’s how:
- Open the Raspberry Pi Configuration tool by typing
sudo raspi-configin the terminal. - Use the arrow keys to navigate to
Interfacing Optionsand hit Enter. - Select
SSHand enable it. - That’s it! SSH is now active on your Raspberry Pi.
Don’t forget to note down your Raspberry Pi’s IP address. You’ll need it later when connecting remotely.
Step 2: Install an SSH Client
To connect to your Raspberry Pi from another device, you’ll need an SSH client. If you’re using a Windows PC, PuTTY is a popular choice. Mac and Linux users already have SSH built into their systems, so you’re good to go!
Here’s how to install PuTTY on Windows:
- Download PuTTY from the official website.
- Run the installer and follow the on-screen instructions.
- Once installed, open PuTTY and enter your Raspberry Pi’s IP address in the Host Name field.
And just like that, you’re ready to connect!
Understanding Your Raspberry Pi’s IP Address
Your Raspberry Pi’s IP address is like its digital address. It’s what allows other devices to locate and connect to it over a network. There are two types of IP addresses you should know about:
- Local IP Address: This is the address assigned to your Raspberry Pi within your local network. It usually starts with 192.168 or 10.0.
- Public IP Address: This is the address of your router on the internet. You’ll need this to access your Raspberry Pi from outside your home network.
To find your Raspberry Pi’s local IP address, type hostname -I in the terminal. For your public IP address, simply Google “what is my IP” or check your router’s settings.
Setting Up Port Forwarding
Port forwarding is like a secret handshake that allows your Raspberry Pi to communicate with the outside world. Without it, your SSH connection won’t work from outside your home network.
Why Is Port Forwarding Important?
Think of your router as a bouncer at a club. Without port forwarding, the bouncer won’t let anyone in, even if they’re trying to connect to your Raspberry Pi. By setting up port forwarding, you’re telling the bouncer which devices are allowed to communicate with your Pi.
How to Set Up Port Forwarding
Here’s a step-by-step guide:
- Log in to your router’s admin page. The URL is usually something like
192.168.0.1or192.168.1.1. - Find the port forwarding section. It might be labeled as “Port Forwarding,” “Virtual Servers,” or something similar.
- Create a new rule and set the external port and internal port to 22 (the default SSH port).
- Enter your Raspberry Pi’s local IP address as the destination address.
- Save the changes and restart your router if necessary.
With port forwarding set up, you’re one step closer to accessing your Raspberry Pi from anywhere!
Using a Dynamic DNS Service
Your public IP address can change from time to time, which can make it tricky to connect to your Raspberry Pi remotely. That’s where Dynamic DNS (DDNS) comes in. DDNS services assign a static hostname to your dynamic IP address, so you don’t have to worry about remembering long numbers.
Some popular DDNS services include:
- No-IP
- DuckDNS
- Dynu
Here’s how to set up DDNS:
- Sign up for a DDNS service and create a hostname.
- Install the DDNS client on your Raspberry Pi. Most services offer a script or app to automate the process.
- Configure the client to update your hostname whenever your IP address changes.
With DDNS, you’ll always have a reliable way to connect to your Raspberry Pi, no matter where you are.
Securing Your SSH Connection
Security should always be a top priority when setting up remote access. Here are a few tips to keep your Raspberry Pi safe:
- Change the Default SSH Port: Hackers often target the default port 22. Change it to something less obvious, like 2222 or 12345.
- Use Strong Passwords: Avoid using simple passwords like “password” or “123456.” Use a combination of letters, numbers, and symbols.
- Enable Key-Based Authentication: This adds an extra layer of security by requiring a private key to connect.
- Disable Root Login: Allowing root access over SSH can be risky. Disable it to prevent unauthorized access.
By following these tips, you’ll make it much harder for hackers to break into your Raspberry Pi.
Troubleshooting Common SSH Issues
Even the best-laid plans can go awry. If you’re having trouble connecting to your Raspberry Pi via SSH, here are a few common issues and how to fix them:
- Connection Refused: Make sure SSH is enabled on your Raspberry Pi and that your router is configured correctly.
- Timeout Errors: Double-check your IP address and port settings. Ensure your router isn’t blocking the connection.
- Authentication Failed: Verify that your username and password are correct. If you’re using key-based authentication, ensure your private key is properly configured.
Still stuck? Don’t worry! There are tons of online resources and forums where you can get help from the Raspberry Pi community.
Advanced SSH Techniques
Once you’ve mastered the basics, it’s time to level up your SSH skills. Here are a few advanced techniques to explore:
- Tunneling: Use SSH to create secure tunnels for other protocols, like HTTP or FTP.
- Automation: Set up scripts to automate tasks on your Raspberry Pi via SSH.
- SSHFS: Mount remote directories on your local machine for easy file management.
These techniques can take your Raspberry Pi setup to the next level, making it even more powerful and versatile.
Conclusion: Take Control of Your Raspberry Pi Anywhere
Accessing your Raspberry Pi via SSH from anywhere is a game-changer. Whether you’re a tech enthusiast, a hobbyist, or just someone looking to simplify their life, SSH offers the tools you need to control your device remotely. By following the steps in this guide, you’ll be able to set up SSH, secure your connection, and troubleshoot any issues that arise.
So, what are you waiting for? Dive in, experiment, and see what you can accomplish with your Raspberry Pi. And don’t forget to share your experiences in the comments below. Who knows? You might just inspire someone else to take their tech journey to the next level!
Table of Contents
- What is SSH and Why Should You Use It?
- Why Use Raspberry Pi for Remote Access?
- How to Set Up SSH on Your Raspberry Pi
- Understanding Your Raspberry Pi’s IP Address
- Setting Up Port Forwarding
- Using a Dynamic DNS Service
- Securing Your SSH Connection
- Troubleshooting Common SSH Issues
- Advanced SSH Techniques
- Conclusion: Take Control of Your Raspberry Pi Anywhere