Alright, let’s dive straight into it—SSH to Raspberry Pi over the internet is like giving your little Raspberry buddy a superpower. Imagine being able to control your Raspberry Pi remotely from anywhere in the world. Sounds cool, right? Well, it’s not just cool; it’s incredibly practical for hobbyists, developers, and even businesses. But here’s the thing—doing it safely and securely is where the real challenge lies. In this article, we’ll break down everything you need to know about SSHing to your Raspberry Pi over the internet without compromising your security. So grab a coffee, sit back, and let’s get geeky!
SSH, or Secure Shell, is basically the Swiss Army knife of remote access tools. It lets you connect to your Raspberry Pi from any device as long as you’ve got an internet connection. But there’s a catch: exposing your Pi directly to the internet can make it vulnerable to hackers. That’s why we’re here—to teach you how to set up SSH properly and keep your setup secure.
Now, before we go any further, let me just say this: if you’re thinking, “Do I really need to know this?”—the answer is yes. Whether you’re running a home automation system, a media server, or even a small web server, being able to SSH into your Pi remotely can save you tons of time. Plus, it’s just plain awesome. So buckle up, because we’re about to take you through the ins and outs of remote SSH access.
Read also:Kannada Prabha Today Epaper Your Daily Dose Of News In Karnataka
Table of Contents:
- Introduction to SSH on Raspberry Pi
- Why SSH Matters
- Setting Up SSH on Your Raspberry Pi
- Understanding Port Forwarding
- Using Dynamic DNS (DDNS)
- Securing Your SSH Connection
- Tools to Simplify SSH Access
- Common Issues and Troubleshooting
- Advanced SSH Techniques
- Wrapping It Up
Introduction to SSH on Raspberry Pi
So, what exactly is SSH, and why should you care? SSH stands for Secure Shell, and it’s a protocol that allows you to remotely access and control another device—like your Raspberry Pi—over a network. Think of it like a secure tunnel between your computer and your Pi. You can run commands, transfer files, and even set up services—all from the comfort of your couch or from across the globe.
Now, SSH isn’t just about convenience; it’s also about security. Unlike other protocols that send data in plain text, SSH encrypts everything, making it much harder for bad actors to intercept your information. And when you’re dealing with sensitive data or running important services on your Pi, that extra layer of protection is crucial.
But here’s the kicker: getting SSH to work over the internet isn’t as simple as flipping a switch. You’ve got to consider things like firewalls, port forwarding, and even dynamic IP addresses. Don’t worry, though—we’ll walk you through all of that in just a sec.
Why SSH Matters
SSH might seem like just another tech term, but trust me, it’s a game-changer. Whether you’re a developer, a hobbyist, or someone who just likes tinkering with gadgets, SSH can make your life so much easier. Let’s break it down:
- Remote Control: SSH lets you control your Raspberry Pi from anywhere, whether you’re at home, at work, or on vacation.
- Automation: Need to automate tasks on your Pi? SSH makes it a breeze to run scripts and manage processes remotely.
- Security: With encryption built right in, SSH ensures that your data stays safe and secure, even over public networks.
- Flexibility: You can use SSH for everything from file transfers to setting up servers, making it an incredibly versatile tool.
And let’s not forget the peace of mind that comes with knowing your Pi is protected. In today’s digital world, security is more important than ever. By mastering SSH, you’re not just gaining a new skill—you’re also safeguarding your devices.
Read also:Temporary Replacement 3hyungry Your Ultimate Guide To Finding The Best Substitutes
Setting Up SSH on Your Raspberry Pi
Alright, let’s get our hands dirty. The first step in SSHing to your Raspberry Pi over the internet is setting up SSH on the Pi itself. Here’s how you do it:
Enabling SSH on Raspberry Pi OS
By default, SSH is disabled on newer versions of Raspberry Pi OS. To enable it, follow these steps:
- Boot up your Raspberry Pi and log in.
- Open the terminal and type
sudo raspi-config. - Navigate to “Interfacing Options” and select it.
- Choose “SSH” and hit “Enable.”
- Reboot your Pi to apply the changes.
Boom! SSH is now enabled on your Pi. But wait, there’s more. You’ll also want to make sure your Pi has a static IP address so you can connect to it consistently. Here’s how:
Assigning a Static IP Address
Having a static IP address ensures that your Pi’s IP doesn’t change every time you reboot it. To set one up:
- Open the terminal and type
sudo nano /etc/dhcpcd.conf. - Scroll to the bottom of the file and add the following lines:
interface eth0
static ip_address=192.168.1.100/24
static routers=192.168.1.1
static domain_name_servers=192.168.1.1
Replace the IP addresses with ones that match your network settings. Save and exit, then reboot your Pi.
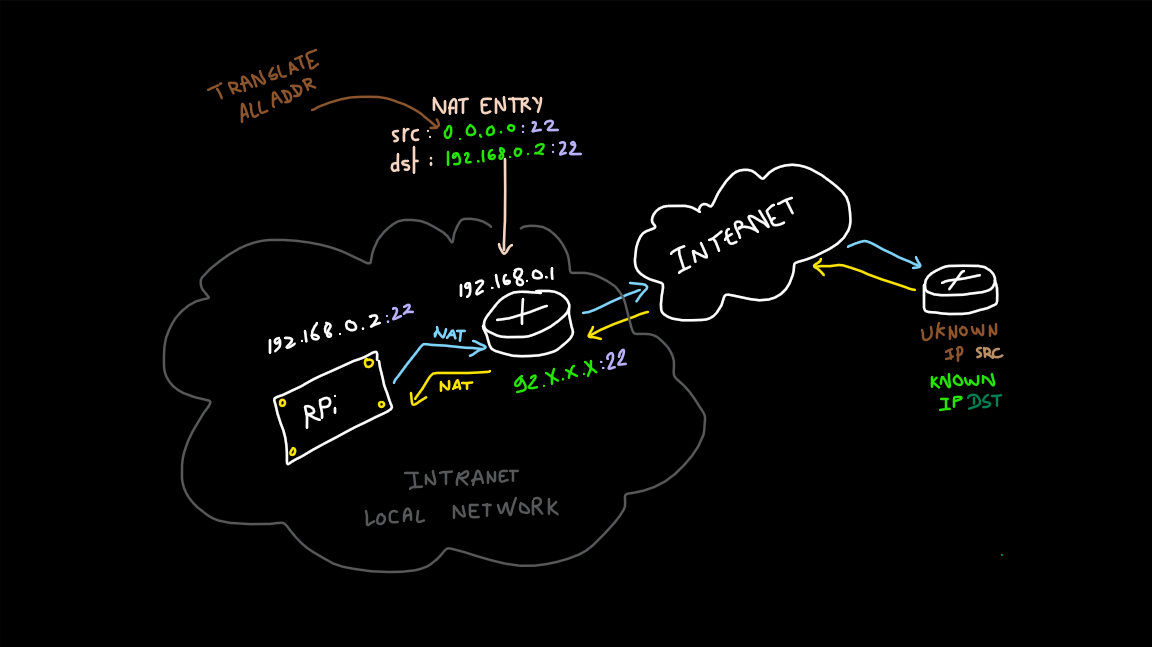
Understanding Port Forwarding
Port forwarding is like giving your Pi a secret handshake with the outside world. It allows you to direct incoming traffic from the internet to your Pi’s SSH port (usually port 22). Here’s how it works:
First, log in to your router’s admin interface. This usually involves typing your router’s IP address into a browser (commonly 192.168.1.1 or 192.168.0.1). Once you’re in, find the “Port Forwarding” section. You’ll want to create a new rule that forwards traffic from port 22 (or any other port you choose) to your Pi’s local IP address.
Here’s a quick example:
- External Port: 2222
- Internal Port: 22
- IP Address: 192.168.1.100
By using a different external port (like 2222), you’re adding an extra layer of security by avoiding the default SSH port.
Using Dynamic DNS (DDNS)
If your internet service provider assigns you a dynamic IP address, you’ll need a way to keep track of it. That’s where Dynamic DNS (DDNS) comes in. DDNS services like No-IP or DuckDNS provide you with a hostname that updates automatically whenever your IP changes.
To set up DDNS:
- Create an account with a DDNS provider.
- Download and install their client software on your Pi.
- Configure the client to update your hostname with your current IP address.
Now, instead of trying to remember a constantly changing IP address, you can simply use a hostname like myraspberrypi.ddns.net.
Securing Your SSH Connection
Security should always be top of mind when setting up SSH. Here are a few tips to keep your Pi safe:
- Change the Default Port: As mentioned earlier, avoid using port 22. Choose something less obvious, like 2222 or 4444.
- Use Strong Passwords: Make sure your Pi’s user accounts have strong, unique passwords. Better yet, disable password authentication altogether and use SSH keys instead.
- Enable SSH Keys: Generate an SSH key pair on your local machine and add the public key to your Pi’s authorized_keys file. This way, you can log in without needing a password.
- Limit User Access: Restrict SSH access to specific users by editing the
/etc/ssh/sshd_configfile.
Remember, security is a marathon, not a sprint. Regularly update your Pi’s software and keep an eye on any suspicious activity.
Tools to Simplify SSH Access
There are plenty of tools out there to make SSHing to your Pi easier. Here are a few worth checking out:
SSH Clients
If you’re on Windows, PuTTY is a popular choice for SSH connections. For macOS and Linux users, the built-in terminal works just fine. And if you’re feeling fancy, there’s always apps like Termius or MobaXterm that offer additional features like session management and file transfer.
SSH Tunnels
SSH tunnels are great for securely accessing services on your Pi, like web servers or databases. They work by creating an encrypted connection between your local machine and your Pi, allowing you to access internal services as if you were on the same network.
Common Issues and Troubleshooting
Even the best-laid plans can go awry. Here are some common issues you might encounter when setting up SSH to your Raspberry Pi:
- Connection Refused: Double-check your port forwarding settings and ensure your Pi’s SSH service is running.
- Host Key Verification Failed: This usually happens when the host key has changed. Try deleting the offending key from your
~/.ssh/known_hostsfile. - Permission Denied (Public Key): Make sure your public key is correctly added to the
~/.ssh/authorized_keysfile on your Pi.
If all else fails, don’t hesitate to consult the official Raspberry Pi documentation or forums. Chances are, someone else has already solved the same problem.
Advanced SSH Techniques
Once you’ve got the basics down, it’s time to level up your SSH game. Here are a few advanced techniques to explore:
SSH Tunneling
As mentioned earlier, SSH tunnels are a powerful way to access internal services securely. For example, you can use an SSH tunnel to access a web server running on your Pi by forwarding a local port to the Pi’s web server port.
SSH Multiplexing
SSH multiplexing allows you to reuse existing SSH connections, reducing the overhead of establishing new ones. This is especially useful if you’re frequently connecting to the same Pi.
SSH Jump Hosts
If your Pi isn’t directly accessible from the internet, you can use an intermediate server as a jump host. This allows you to connect to your Pi via the jump host, keeping everything nice and secure.
Wrapping It Up
And there you have it—a comprehensive guide to SSHing to your Raspberry Pi over the internet. From setting up SSH and port forwarding to securing your connection and troubleshooting common issues, we’ve covered all the bases. Remember, the key to success is patience and attention to detail. Take your time, follow the steps carefully, and don’t hesitate to ask for help if you get stuck.
So, what are you waiting for? Go ahead and give it a try. Once you’ve got SSH up and running, you’ll wonder how you ever lived without it. And if you’ve got any questions or tips of your own, drop them in the comments below. Happy hacking, and stay secure out there!