Ever wondered how to access your Raspberry Pi from anywhere in the world even when it's behind a router? SSH Raspberry Pi behind router is the solution you've been looking for. Setting up secure shell (SSH) on your Raspberry Pi is like giving yourself a remote control to your tiny computer no matter where you are. Whether you're a tech enthusiast or a beginner, this guide will walk you through the process step by step.
Now, I know what you're thinking—“Isn’t this only for hardcore techies?” Nope! SSH isn’t as intimidating as it sounds. In fact, once you get the hang of it, it's as easy as riding a bike. Whether you want to manage your home server, control smart home devices, or just tinker around with your Raspberry Pi, SSH is your golden ticket to remote access.
So, grab your favorite beverage, sit back, and let’s dive into the world of SSH Raspberry Pi behind router. By the end of this guide, you’ll be able to set up your Raspberry Pi like a pro and access it from anywhere, anytime. Ready? Let’s go!
Read also:Hyungry Temporary The Ultimate Guide To Temporary Hunger Solutions
Table of Contents
- Introduction to SSH
- Why SSH Behind Router?
- Preparing Your Raspberry Pi
- Enabling SSH on Raspberry Pi
- Finding Your Raspberry Pi IP Address
- Port Forwarding Basics
- Setting Up Dynamic DNS
- Testing SSH Connection
- Security Tips for SSH
- Troubleshooting Common Issues
- Conclusion
Introduction to SSH
Alright, let's start with the basics. What is SSH anyway? SSH stands for Secure Shell, and it's like a secure tunnel that lets you communicate with another computer remotely. Think of it as a secret handshake between your computer and your Raspberry Pi. It’s not just about typing commands; it’s about doing it securely.
SSH uses encryption to protect your data while it’s traveling across the internet. This means no one can snoop on your activities, which is crucial if you’re managing sensitive information. Whether you’re running a web server, controlling IoT devices, or just tinkering around, SSH keeps everything safe and sound.
Now, why is SSH so important when your Raspberry Pi is behind a router? Well, routers act as a barrier between your local network and the internet. They protect your devices from unwanted access, but they also make it harder to connect remotely. Setting up SSH behind a router involves a few extra steps, but don’t worry—we’ll cover all of them in this guide.
Why SSH Behind Router?
Let’s talk about why you’d want to SSH into your Raspberry Pi when it’s behind a router. First off, routers are awesome at keeping unwanted traffic out, but they can also block legitimate traffic if you don’t configure them correctly. By setting up SSH behind a router, you’re essentially telling the router to let specific traffic through.
Here are a few reasons why SSH behind a router is a game-changer:
Read also:Top Picks For Restaurants In Coconut Creek Casino Your Ultimate Dining Guide
- Remote Access: Access your Raspberry Pi from anywhere in the world using just an internet connection.
- Security: SSH encrypts all your data, so even if someone intercepts it, they won’t be able to read it.
- Automation: Run scripts, manage servers, or control smart home devices without being physically present.
- Convenience: No need to carry your Raspberry Pi around—just access it remotely whenever you need it.
It’s like having a superpower for your Raspberry Pi. You can control it from your laptop, phone, or even a tablet. Pretty cool, right?
Preparing Your Raspberry Pi
Before we dive into the nitty-gritty of SSH, let’s make sure your Raspberry Pi is ready to roll. Here’s what you’ll need:
- Raspberry Pi: Any model will do, but make sure it’s up and running.
- Power Supply: Don’t forget to plug it in!
- MicroSD Card: Preloaded with the latest version of Raspberry Pi OS.
- Network Connection: Wired or wireless—it’s up to you.
Once you’ve got everything set up, it’s time to configure your Raspberry Pi. Make sure it’s connected to your local network and can access the internet. You can do this by checking the network settings in Raspberry Pi OS. If everything looks good, you’re ready to move on to the next step.
Installing Raspberry Pi OS
If you haven’t installed Raspberry Pi OS yet, here’s a quick rundown:
- Download the Raspberry Pi Imager from the official website.
- Insert your microSD card into your computer.
- Launch the Raspberry Pi Imager and select the latest version of Raspberry Pi OS.
- Write the image to your microSD card and insert it into your Raspberry Pi.
That’s it! Your Raspberry Pi is now ready to rock.
Enabling SSH on Raspberry Pi
Alright, let’s enable SSH on your Raspberry Pi. This is where the magic happens. SSH is disabled by default in Raspberry Pi OS for security reasons, but enabling it is super easy. Here’s how:
Method 1: Using Raspberry Pi Configuration
Fire up your Raspberry Pi and open the terminal. Type the following command:
sudo raspi-config
This will launch the Raspberry Pi configuration tool. Navigate to Interfacing Options, then select SSH. Enable it and exit the tool. That’s it—you’ve just enabled SSH on your Raspberry Pi!
Method 2: Creating an SSH File
If you’re setting up a headless Raspberry Pi (no monitor or keyboard), you can enable SSH by creating a file called ssh on the boot partition of your microSD card. Here’s how:
- Insert your microSD card into your computer.
- Open the boot partition and create a new file called ssh (no extension).
- Insert the microSD card back into your Raspberry Pi and boot it up.
Voilà! SSH is now enabled on your Raspberry Pi.
Finding Your Raspberry Pi IP Address
Now that SSH is enabled, you’ll need to find your Raspberry Pi’s IP address. This is the address your router assigns to your Pi on your local network. Here’s how to find it:
Method 1: Using Raspberry Pi OS
Open the terminal on your Raspberry Pi and type:
hostname -I
This will display your Pi’s IP address. It should look something like 192.168.1.100.
Method 2: Using Your Router
If you don’t have access to your Raspberry Pi’s terminal, you can check your router’s device list. Most routers have a web interface where you can see all connected devices. Look for your Raspberry Pi’s name (usually RaspberryPi) and note down its IP address.
Once you’ve got the IP address, you’re ready to move on to the next step.
Port Forwarding Basics
Here’s where things get interesting. To access your Raspberry Pi from outside your local network, you’ll need to set up port forwarding on your router. Port forwarding tells your router which device to send incoming SSH traffic to.
Here’s how to set it up:
- Log in to your router’s web interface (usually 192.168.1.1).
- Find the port forwarding section. It might be called Port Forwarding, Virtual Servers, or something similar.
- Create a new rule and set the following:
- Service Name: SSH
- External Port: 22
- Internal Port: 22
- IP Address: Your Raspberry Pi’s IP address
- Save the settings and restart your router.
That’s it! Your router now knows to forward SSH traffic to your Raspberry Pi.
Checking Your Router’s External IP Address
Before you test your SSH connection, you’ll need to know your router’s external IP address. You can find this by visiting whatismyip.com or a similar website. Note it down—you’ll need it to connect to your Raspberry Pi from outside your local network.
Setting Up Dynamic DNS
Here’s a tip: your router’s external IP address can change over time, which can make it tricky to connect to your Raspberry Pi. That’s where Dynamic DNS (DDNS) comes in. DDNS assigns a hostname to your router’s IP address, so you can connect to your Pi using a domain name instead of an IP address.
Here’s how to set it up:
- Sign up for a DDNS service like No-IP or DuckDNS.
- Create a hostname and link it to your router’s external IP address.
- Install the DDNS client on your router or Raspberry Pi to keep the hostname updated.
Now you can connect to your Raspberry Pi using a hostname like myraspberrypi.ddns.net. Much easier to remember, right?
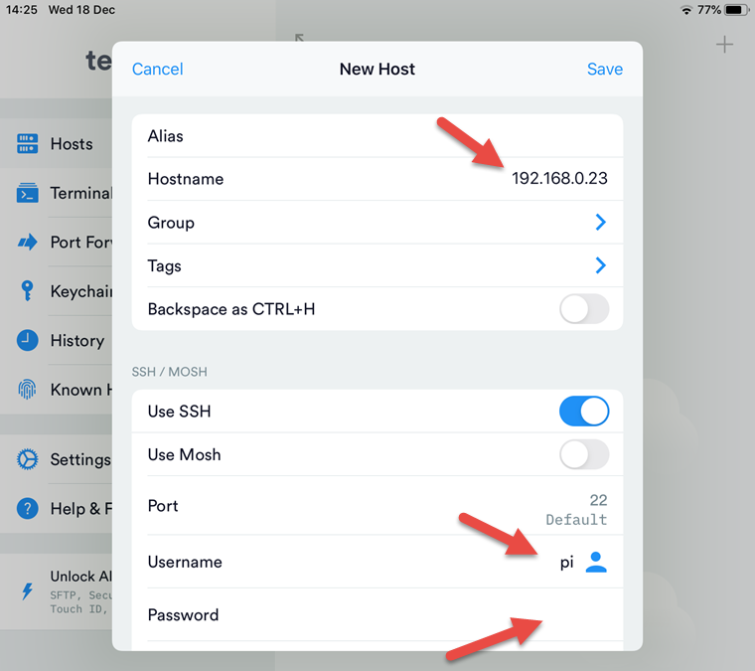
Testing SSH Connection
It’s time to put everything to the test. Open a terminal on your computer and type:
ssh pi@your_router_ip
Replace your_router_ip with your router’s external IP address or DDNS hostname. You’ll be prompted to enter your Raspberry Pi’s password. Once you’re in, congratulations—you’ve successfully SSHed into your Raspberry Pi!
Try running a few commands to make sure everything’s working as expected. For example:
ls
sudo apt update
If everything works, you’re good to go!
Security Tips for SSH
Now that you’ve set up SSH, let’s talk about security. SSH is secure by default, but there are a few things you can do to make it even safer:
- Change the Default Port: Instead of using port 22, change it to something less obvious. This makes it harder for attackers to find your SSH server.
- Disable Password Authentication: Use SSH keys instead of passwords. This adds an extra layer of security.
- Limit Access: Restrict SSH access to specific IP addresses or networks.
- Use Fail2Ban: Fail2Ban is a tool that blocks IP addresses that try to brute-force your SSH server.
By following these tips, you’ll keep your Raspberry Pi safe from prying eyes.
Troubleshooting Common Issues
Let’s face it—things don’t always go as planned. Here are a few common issues you might encounter and how to fix them:
- Can’t Connect: Make sure SSH is enabled on your Raspberry Pi and port forwarding is set up correctly.
- Connection Refused: Check your router’s firewall settings and make sure port 22 is open.
- IP Address Changed: If your router’s external IP address changes, update